Customize scorecards
To make changes to a scorecard or its profiles, you need to select a custom scorecard, create a custom scorecard from a scorecard template, or select a scorecard template that you created.
What can I customize?
Almost everything is customizable in Clinical Analytics! If you want to reorganize, add to, or remove from your scorecard, you can! This illustration gives you an idea of the customization hierarchy in Scorecards.
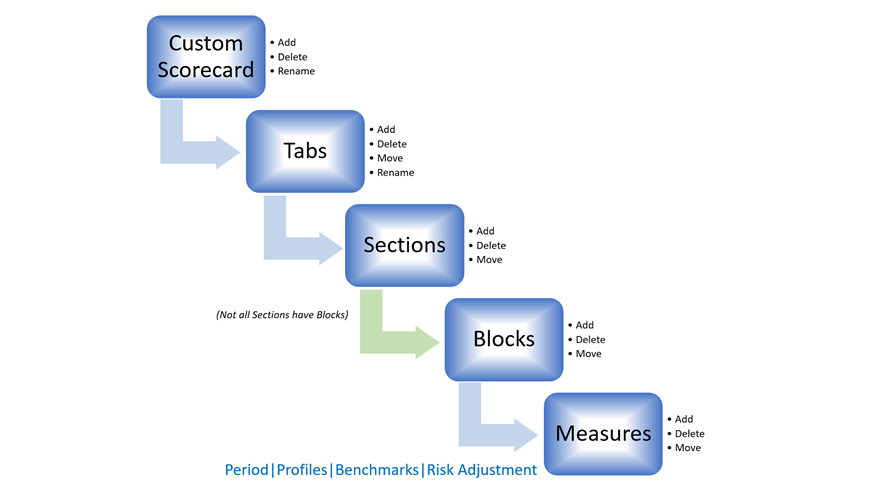
You can read more about these hierarchy levels on the Tabs, Sections, & Blocks page. As you are customizing your scorecard, don't forget that Profiles are unique to each scorecard and you can read more about them on the Profiles page.
There are common functions for customization across these levels:
- Add
- Delete
- Move
- Rename
Let's explore these functions for each level of the cascade. The majority of the functions are performed while viewing the scorecard by clicking the Customizer pencil icon in the upper right corner of the screen. To exit Customizer Mode and return to viewing your data, click the green check button in the upper right corner.
Customizer Mode
To enter Customizer Mode, click the pencil icon in the top right corner.

In Customizer Mode, the scorecard looks different:
- The Edit icon becomes a green check for exiting Customizer Mode.
- Sections display the name and any settings options instead of data.
Custom scorecard
- ADD: To add a custom scorecard, select a Scorecard template similar to what you want, click the pencil icon to customize it, and enter the name of the new custom scorecard. See Scorecard structure for more details.
- You can also copy another Custom scorecard by clicking Copy in the Actions column. Enter a name for the new Custom scorecard, and click OK.
- DELETE: Click Delete in the Actions column next to a custom scorecard to delete the Custom scorecard.
- RENAME: Click the scorecard name to view it. Click the Customizer pencil icon in the upper right corner to customize the scorecard. Along the top of the scorecard, you can now change the name of your custom scorecard. The name is saved when you click the green check to exit Customizer Mode.
- CONVERT TO TEMPLATE: When you are ready to share your Custom Scorecard with others.
Tabs
NOTE: All these actions are performed while in Customizer mode; enter the scorecard to modify, and click the Customizer pencil icon in the upper right corner.
- ADD: Each scorecard can have a maximum of seven tabs. When you have fewer than seven tabs and are in Customizer Mode, an +Add tab button appears to the right of all others. Clicking this button adds a blank tab that you can rename and add sections.
- DELETE: To remove a tab, click the trash can icon to the right of the tab name while in Customizer Mode.
- RENAME: While in Customizer Mode, click the pencil icon to the right of the tab name, enter the new tab name, and click Apply.
- MOVE: To reorder your tabs, click and hold the horizontal arrows to the left of the tab name, and then drag the tab to the desired location.
Sections
For more information about available analytics for your scorecard, see Scorecards sections.
NOTE: All these actions are performed while in Customizer mode; enter the scorecard to modify and click the Customizer pencil icon in the upper right corner.
- ADD: To add sections to a tab, click the Customizer pencil icon in the upper right corner of the screen and make sure your tab of choice is highlighted to confirm that you are adding the section to the correct tab. Click +Add Section in the top right corner of the tab area, then click to open the dropdown.
- Click the section you would like to add, select any applicable options for the section, then click the green check mark in the upper right corner to exit Customizer Mode, and view your data in the new section.
NOTE: New sections are added to the very bottom of the selected scorecard; you may need to scroll down the page to see the section. See the following Move instructions for moving the section higher on the tab.
- DELETE: To remove a section, click the trash can icon to the right of the section name while in Customizer Mode.
- RENAME: While in Customizer Mode, click the pencil icon to the right of the section name, enter the new section name, and click Apply.
- MOVE: To reorder your sections, click and hold the vertical arrows to the left of the section name, and then drag the section to the desired location.
NOTE: You can move a section only within a tab; to see it on another tab, you must add the section to the other tab.
Blocks
Only the Two Column section has blocks. If you would like to add a speedometer or line chart to your scorecard, you must add a Two Column section to one of your tabs.
NOTE: All these actions are performed while in Customizer mode; enter the scorecard to modify and click the Customizer pencil icon in the upper right corner.
- ADD: After you have added a Two Column section to your tab (see Scorecard sections), scroll to the section header, and click Add Block on the right side.
- Select if you would like a line chart or speedometer, and click OK.
- Click the check box next to the measure you would like displayed in the block, and click OK.
- When you have selected all of block options, click the green check to exit Customizer Mode and view your graphic.
- DELETE: To remove a block, click the X icon in the top right corner of the block.
- RENAME: Because a block is named by the measure it contains, you cannot rename a block. If you want to change the measure, delete the block and add a new block with your measure of choice.
- MOVE: To reorder your blocks, click and hold the two-way arrows to the left of the block name, and then drag the block to the desired location. You can move blocks to be side-by-side by dragging the block above another block until the light yellow box appears, and then dragging to the right to position it in the right column.
